

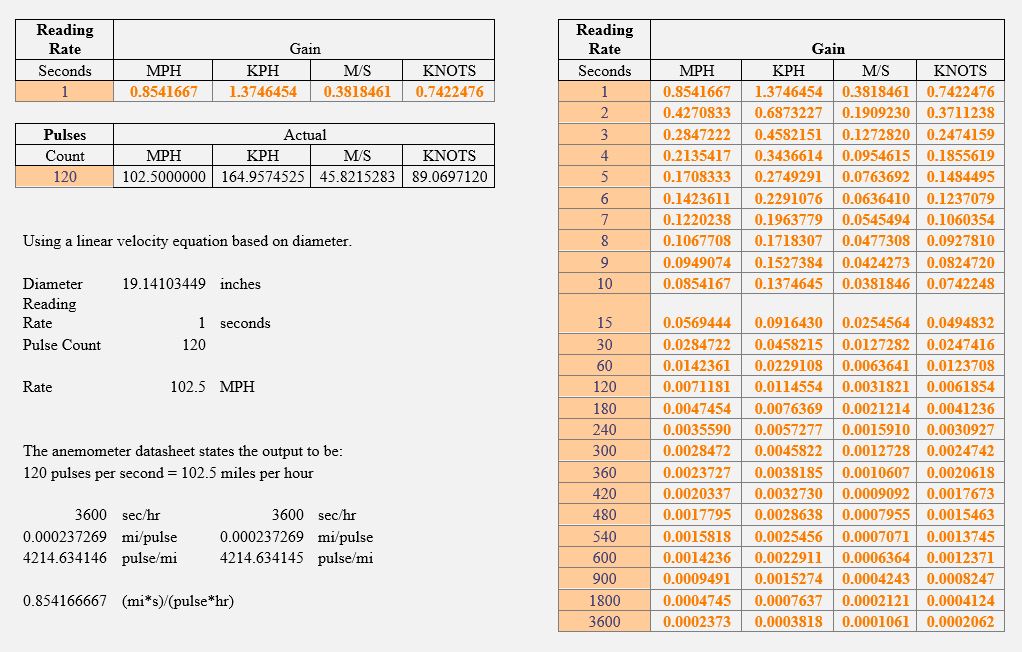
The Wind101A comes programmed with an engineering unit to provide the average wind speed using a 10 second reading rate. If a different reading interval is desired, a different engineering unit must be created to properly scale pulses to wind speed.
Note: these instructions assume that the Comptus anemometer from the Wind101A kit is being used. If it is any other sensor, the instructions for setting up the unit will be appropriate, but the scaling (gain/offset) will be entirely different, and should be determined based on the sensor manufacturer’s output specifications.
For most users and applications, better results (and certainly better battery life) can be acheived by slowing down the reading interval. This leads to a better idea of average wind speed rather than just gusts vs. no wind. For example a 1 minute reading interval is still reasonably granular data, without being quite so noisy, and is much better for battery life.
The larger chart below on the right hand side shows the majority of selectable reading intervals/rates, and the corresponding Gain to use when setting up an engineering unit.
There are two ways to create an engineering unit for Pulse loggers. The first is based on the older method of doing engineering units, where the “rate” was based on the reading interval. The second is based on the new functionality of creating an engineering unit that IS a rate, so it will work with any reading interval by recalculating the engineering unit on-the-fly. The first method is conceptually easier and only creates a single unit, but cannot be used for other reading intervals. The second may create some slight confusion in that rate units will also create multiple additional units for different rates (per second, per minute, per hour, etc.) but is more flexible if different reading intervals will be used.
To create the engineering unit for the previously recorded data:
(Note: These instructions use an assumed 60 second reading interval, but the gain and description for a different reading interval can be used if desired, based on the information in the chart above)
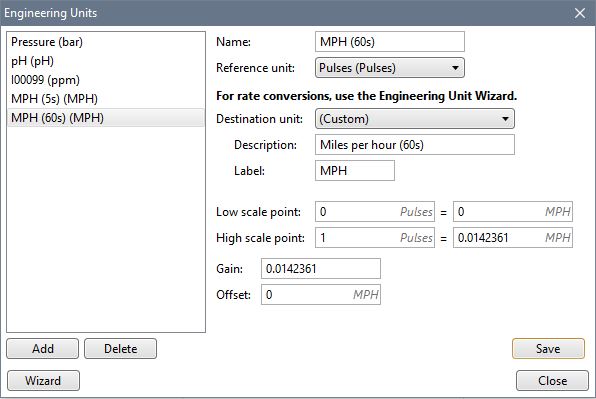
- Click the Engineering Units button on the Device toolbar.
- Click the Add button, which will results in cleared fields for a new unit.
- Name the unit MPH (60s)
- Change the Reference unit to Pulses
- Leave the Destination unit on (Custom)
- Change the Description to MPH (60s)
- Change the Label to MPH
- Change the Gain to 0.0142361
- Click Save
- The unit is now in the list of available engineering units.
Entering via this method also calculates the High scale point automatically, to make it the same as the Gain. The number could have been entered in as a high scale point instead for the same results, as it would have calculated it as the gain. Since 0 is still 0 both before and after scaling, there is no offset. This is essentially saying that every pulse is equivalent to 0.0142361 miles per hour, at a sixty second reading interval.
Use this same method to create a different engineering unit different intervals, using the gain information in the chart above.
The second method is to create a unit that is a rate.
- Click the Engineering Units button on the Device toolbar.
- Click the Wizard button. Read the instructions and click Next.
- Select No, just create a unit.
- Select Pulses, then click Next.
- Select My unit is a rate
- Name the unit MPH
- Change the Pulse interval to Second (minute or hour could also be used, if you selected the corresponding gain from the chart)
- Change the Destination Unit to Miles
- Change the Unit interval to Hours
- Click Next
- Click Gain and Offset
- Change to Gain to 0.8541667 (the gain for 1 second in the chart below, based on the Pulse interval we selected above)
- Click Next and Close.
- The unit is now in the list of available engineering units. When selecting the engineering unit in a report, the other rate intervals (per minute, per hour) have also been created automatically and can be selected.
After creating the unit, in an open report right-click on the Y-Axis (unit axis) and select the new engineering unit.
If only a single reading interval, and single engineering unit is to be used, it can also be applied to the logger in the device’s Properties screen, in the Engineering Units tab.
